
Tuesday, August 21, 2012
Friday, May 11, 2012
Tip of the Month - May!
This month I've got a tip for spinners!
I've been teaching for a very long time, as some of you know, since the early 80's actually, and over that time new spinners have brought second hand wheels into the class that they haven't been able to get to work. All that needs doing to the vast majority is:

A little oiling on most of the moving parts.
Most modern wheels don't need oiling, but old models do!
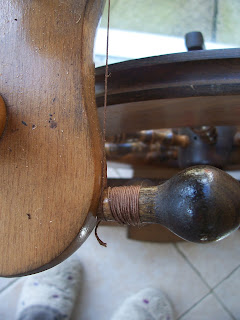
To remove the old nylon fishing line Scotch Tension band, which has set in position and won't allow adjustment, to a long length of linen buttonhole thread. (Yes, this will fray, but cut off the frayed bit and re-tie to the spring/elastic band and it's as good as new!) This tip was given to me in the early 80's by Sue Hailey Harris at one of her silk spinning workshops and has been the best thing I've done on all my old wheels!
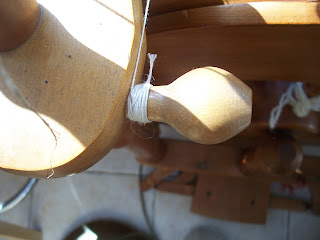
A change of a worn drive band, correctly set so that it can be used with all ratios. (If you have a stretchy nylon one, don't forget to remove it when the wheel is not being used otherwise it will stretch too much and you'll have to take a chunk out!)
I've been teaching for a very long time, as some of you know, since the early 80's actually, and over that time new spinners have brought second hand wheels into the class that they haven't been able to get to work. All that needs doing to the vast majority is:
A little oiling on most of the moving parts.
Most modern wheels don't need oiling, but old models do!


To remove the old nylon fishing line Scotch Tension band, which has set in position and won't allow adjustment, to a long length of linen buttonhole thread. (Yes, this will fray, but cut off the frayed bit and re-tie to the spring/elastic band and it's as good as new!) This tip was given to me in the early 80's by Sue Hailey Harris at one of her silk spinning workshops and has been the best thing I've done on all my old wheels!
The linen comes in brown.....
...and white.
A change of a worn drive band, correctly set so that it can be used with all ratios. (If you have a stretchy nylon one, don't forget to remove it when the wheel is not being used otherwise it will stretch too much and you'll have to take a chunk out!)
Hay presto! The wheel works again!
Thursday, May 10, 2012
My Studio and Loom Shed!
We moved in August last year and I've been moving both my studio and loom shed around a bit! It always seems to take a bit of time to get settled in a new space, but I really wasn't happy with the studio space.
So over the last couple of weeks, when I had time, I began to re-organise my space. I use a laptop computer and my chiropractor had told me to raise it so that I would get less neck pain and have spent a week or two using an old bed table, the ones that can be used in bed, raised and lowered and adjusted to an angle. This was so useful that I realised that my studio table needed some adjustment.
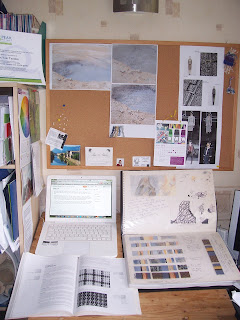 I took one of the leaves off my table and positioned it so that it could be at one of two angles, depending if I want to stand or sit to work. I also took some useful advise from the Craft Corner Blog. It's aimed at the sewing community, but never the less, it's got some great tips to keep your space nice and neat and I hope you find it useful, too!
I've still some refinements to the table, but I'm pleased with it so far.
 My library!
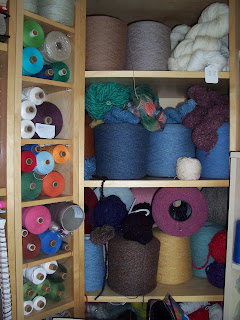 Just a small part of my yarn store!
I'll show you my "loom shed" in another post.
So over the last couple of weeks, when I had time, I began to re-organise my space. I use a laptop computer and my chiropractor had told me to raise it so that I would get less neck pain and have spent a week or two using an old bed table, the ones that can be used in bed, raised and lowered and adjusted to an angle. This was so useful that I realised that my studio table needed some adjustment.

I've still some refinements to the table, but I'm pleased with it so far.


I'll show you my "loom shed" in another post.
Thursday, April 12, 2012
Deborah Allen - feltmaker

I want to introduce you to Deborah Allen, a very talented felt maker.
I met Deborah via the internet when she joined the Weavers-Spinners-UK group on Yahoo and last year she popped into the Pure Tinctoria stand at Wonderwool Wales to say hello. She purchased the last of a lovely wool boucle yarn I was selling off because I couldn't get anymore. At the time Deborah was going to crochet a jacket with this naturally dyed chunky wool yarn.
Deborah ended up unpicking the jacket, but has used it to great effect in some lovely Hundertwasser inspired wet felted bags that she's been developing. They are so beautiful, I couldn't resist showing them to you.
Her blog is full of wonderful felt inspiration and you can find her work for sale on Etsy. If I had more time, I'd be back felting again!
Thursday, April 05, 2012
Tip of the Month - April
When I'm teaching new weaver to warp their looms, whether multi-shaft or rigid heddle, I often find that they shred their warps when threading the heddles. The reason it happens is that the warp is held taught behind the heddle/slot/hole, allowing the threading hook to run down warp, catching in the ply. This month I'll show you how to stop this happening.
 The images are showing me warping my latest project on an 8 harness mechanical dobby, but the principles apply to any loom.
Grasp your warp yarn about 6" or 15cm in front of the heddle/slot/hole you're going to thread.
 Insert your threading hook in the heddle/slot/hole and move the hand holding the warp to the back of the heddle without moving your hand up the yarn.
 You will now have a loop of yarn behind your heddle which can be placed over the threading hook.
 Pull the loop through the heddle/slot/hole, letting go of the warp with the other hand.
I hope you all find this tip useful. Please let me know if you have any other problems that need solving. If I can help, I'll post them here!
Best wishes and happy weaving, spinning and dyeing.

Grasp your warp yarn about 6" or 15cm in front of the heddle/slot/hole you're going to thread.


I hope you all find this tip useful. Please let me know if you have any other problems that need solving. If I can help, I'll post them here!
Best wishes and happy weaving, spinning and dyeing.
Saturday, March 03, 2012
Tip of the Month - March

First of all, after throwing your shuttle, ensure that the weft goes round the edge warp neatly. Pinch the warp and weft together and gently pull the weft into a 45degree angle.


Being vigilant over this will ensure nice neat, even selvedges that don't pull in.
Friday, February 03, 2012
Tip of the Month - February!
Sometimes you find that the sett isn't right when you've warped you rigid heddle loom. Don't worry! You can change the heddle without causing any problems. Just secure your cross to keep the threads in the correct order. This months tip is just that - Securing your Cross (and can apply to shaft looms too if you want to change your threading).


Remove the wrong rigid heddle and replace with the correct one.
Now you can see the order that the warp ends need to be threaded.


Friday, January 20, 2012
TAFA

Earlier in 2011 Rachel realised that the site (a very nice Blogger site) was getting rather too big, because there were over 400 artists listed. So she set about talking to lots of people, and the members, to decide what to do about it. The upshot is that she organised "Cloud" Funding and raised enough money to pay for a beautiful new site which is truly impressive.
As part of the site, Rachel has asked for a Members Forum so that we can talk to each other which should be a real asset to the group and I for one am looking forward to this development.
Please take a look at the list and have a good exploration of the profiles and products that this world wide community produce. You'll not only be rewarded by seeing some of the very best textile artists in the world, but you will be amazed at the depth of skill there is in the group.
Friday, January 13, 2012
Colour & Weave


Colour & Weave, a set on Flickr.
Four scarves in Colour & Weave hand woven on a rigid heddle loom (Knitters Loom) in JC Rennie 2/11.3nm wool and cashmere.
Monday, January 02, 2012
Tip of the Month - January
There are some times when the quick warping method just doesn't cut the mustard - when you want a long warp or when you have some complex colour changes, for example.
First make a warp using the normal method on a warping board or warping mill and secure the cross as you usually would, then chain.
 As well as your threading/fish hook and rigid heddle, you will need and extra stick.
You will also need to mark the width of your warp on the rigid heddle with a couple of bits of spare thread tied at the bottom of the appropriate slits.
All the loops will be dented in the rigid heddle on a table to prevent the spare stick from falling out of the loops.
 Instead of using cross sticks, insert a loop of thread either side of the cross.
 Place your index finger through the loom at the end of the warp.
 Ensure you can see the cross by spreading the warp within the loop.
 You should be able to see the the first thread, which may or may not be a single thread with a loop at the end.
 Whether it's a singe thread or a double thread, pull it through the first slit and place on the spare stick.
 As you get used to this method you will see the colour changes emerge in the correct order ready for denting in the rigid heddle.
 You will usually have loops to put over the spare stick.
 But sometimes there will be knotted threads, where the colours were changed, you just have to be careful pulling these through the slits.
 Keep going sliding the spare stick through all the loops as you go.
 Once all the loops are through the slits they need to be secured to the spare stick.
 Sorry this is a rather blurred image, but hopefully you can see that I've cut a long length of thread and doubled it.
Pass the two ends through the loop at the other end and put the spare stick through it, pulling tight.
 Take the two ends and tie them at the opposite end of the stick. If you've a stick with a hole at either end you can tie this string through the holes to secure the loops on the stick.
 If you don't have holes, ensure that the string is very secure by tying a number of times round the end of the spare stick.
 Place the rigid heddle into the loom and the spare stick will need to be tied to the back warp stick.
 You will need to loop several small pieces of string evenly across the the back warp stick.
 Tie each one to the spare stick, either side of the loops and evenly across the warp.
All you need to do now is wind onto the back beam as usual.
 Now you've wound onto the back beam, use your threading hook to transfer one the threads in the slit into it's adjacent hole, ensuring you keep the correct colour sequence.
In this picture the first colour sequence, on the right is one light, one dark, followed by two threads of a completely different colour. The next sequence is three dark and one light.
First make a warp using the normal method on a warping board or warping mill and secure the cross as you usually would, then chain.

You will also need to mark the width of your warp on the rigid heddle with a couple of bits of spare thread tied at the bottom of the appropriate slits.
All the loops will be dented in the rigid heddle on a table to prevent the spare stick from falling out of the loops.


Pass the two ends through the loop at the other end and put the spare stick through it, pulling tight.


All you need to do now is wind onto the back beam as usual.

In this picture the first colour sequence, on the right is one light, one dark, followed by two threads of a completely different colour. The next sequence is three dark and one light.
Subscribe to:
Posts (Atom)