Having posted yesterday, it got me thinking about design!
I love designing! Wow, that's a very broad statement, isn't it. But it's true. I spent many years "designing" my weaving, embroidery, knitting, crochet, etc., but in the most part all the things I produced ended up in the loft or at the back of a cupboard, simply because the ideas or design hadn't been thought through sufficiently and as a result I was rather disappointed with the finished article. Sometimes I didn't even finish what I was making. I bet one or two of you have felt like this!
It has taken a while for my design skills to sink in, having taken a couple of courses in design for the penny to finally drop and realise that there really isn't a magic formula to design. To me, it's not a matter of being able to draw and paint, but simply collecting ideas, based round some form of inspiration, and working through these ideas, looking at colour, shape and texture. Then using the ideas to sample, sample and sample! This can apply to any form of craft, be it weaving, spinning or even dyeing. It's the work put in before producing the actual article that makes the article special.
I'm sorry this has turned into one of those boring blogs, without pictures! You can see what I'm like, how shallow I am, if I only read blogs with picture! But I do hope it has given some of you food for thought and give a design course a go. With the right tutors everyone can design!

Saturday, February 14, 2009
Friday, February 13, 2009
Design for Creative Spinners
Hi all
Jane Deane and I have just heard that there are still places on the Design for Creative Spinners course at the National Association of Guilds Summer School in August.
As you know Jane and I are passionate about design, but realise that many people are frightened by it, so we aim, on this course, to dispel some myths! We both maintain that if you can colour in and scribble, you can design and we will show you some simple ways to explore this to help you produce some stunning yarns from a favourite image.
On the right you will see an image of a page of one of my sketchbooks. Although it looks like I've painted a lovely water colour, it's actually an enlargement of the small image which I coloured in!
So if you feel that you are painting or drawing challenged or are stuck in a rut with your spinning, now is your chance to find out a few simple secrets that will revolutionise your spinning and help you to become a yarn designer!
For more information please download the Summer School Brochure here.
And by the way, you don't have to be a guild member to be able to attend!
Jane Deane and I have just heard that there are still places on the Design for Creative Spinners course at the National Association of Guilds
 Summer School in August.
As you know Jane and I are passionate about design, but realise that many people are frightened by it, so we aim, on this course, to dispel some myths! We both maintain that if you can colour in and scribble, you can design and we will show you some simple ways to explore this to help you produce some stunning yarns from a favourite image.
On the right you will see an image of a page of one of my sketchbooks. Although it looks like I've painted a lovely water colour, it's actually an enlargement of the small image which I coloured in!
So if you feel that you are painting or drawing challenged or are stuck in a rut with your spinning, now is your chance to find out a few simple secrets that will revolutionise your spinning and help you to become a yarn designer!
For more information please download the Summer School Brochure here.
And by the way, you don't have to be a guild member to be able to attend!
Sunday, February 08, 2009
Festive Runner Article
Last November I was approached by the Textile Directory to write and article about weaving a Festive Table Runner to appear in the December issue of their Newletter.
For one reason or another, I couldn't find the article when it appeared, but I found it today, 2 months after it was published! Better late than never.
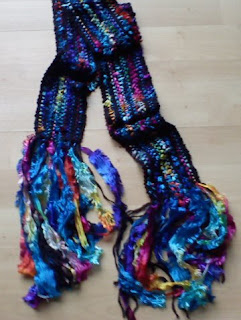
So if you missed it, you can find it here and maybe buy the yarn from Colinette here. Then you can weave your own runner, on a simple rigid heddle loom, in time for next Christmas or another for another occasion, if green and red are not your colours! Colinette yarns are very forgiving if you are new to weaving and produce some stunning results, as seen on the righ. This simple scarf used Wigwam and Firecracker.
While you are on the Textile Directory website, have a good browse, it's packed full of useful articles and information about anything to do with textiles.

For one reason or another, I couldn't find the article when it appeared, but I found it today, 2 months after it was published! Better late than never.
So if you missed it, you can find it here and maybe buy the yarn from Colinette here. Then you can weave your own runner, on a simple rigid heddle loom, in time for next Christmas or another for another occasion, if green and red are not your colours! Colinette yarns are very forgiving if you are new to weaving and produce some stunning results, as seen on the righ. This simple scarf used Wigwam and Firecracker.
While you are on the Textile Directory website, have a good browse, it's packed full of useful articles and information about anything to do with textiles.
Thursday, February 05, 2009
Attaching your warp bouts to your back beam!

Hi all
At last I've time to post the image of how I tie my warp bouts to my back beam.
First of all, those of you who asked for information on how your smooth back beam could be made to take the ties. Well, here is how it's done on my loom, a Louet Octado. You see the stainless steel rod that is loosely attached to my back beam by Texolv cord. The cord is cut into small sections which are screwed to the back beam and the rod is then threaded through these tapes across the back beam.

You will notice that I've attached a very long loop of strong yarn to the rod opposite each section of the beam. All I did was cut a length of thread twice the length from the bar on the back beam to the back of the heddles. I tied it the ends together, threaded each one over the rod and put the loop end through the knot end to secure it to the rod.
Now I make my bouts and secure the cross with bag twist ties and thread the long loop through the end of the bout near the cross. Here you can see the loop through the bout.

I now let the bout drop, but keep hold of the loop and, putting my hand through the loop, I pull the the bout right through the loop. The bout is now trapped in the loop and you can wind it onto the beam as you can see in my post on warping.

This image shows the bout trapped at the end of the loop, just before I put the "cross keeper" round the cross and spread it on the mini raddle.
Subscribe to:
Posts (Atom)